 Imagine for a moment...a dough containing ingredients you are familiar with. A dough that takes forever to dry out and is easier to clean up than a popular commercial brand.
Seriously, I've tried my hand at a number of dough recipes ...and I'm not the "leave well enough alone" kinda girl, so I had to tweak it. You don't have to tweak it to my standard, but I also added a few drops of essential oils and even ground the salt in our Magic Bullet before hand to make it a less grainy product. Don't get me wrong, you can avoid these steps all together and get a great dough, but I had to experiment. You can also divide the mixture into several pans and make different colors. Ingredients: 1 cup flour 2 teaspoons cream of tartar 1/3 cup salt 1 cup of water 1 tablespoon vegetable oil Optional: Food Coloring : We use a a few drops, but you can make the color as intense as you would like. Essential Oils: We used 3-4 drops of Lavender In a 2 quart sauce pan, combine the ingredients above. The mixture should be smooth with a few lumps, so don't worry. You can get the lumps out during the kneading process at the end or when you form it into a ball. Heat the mixture on low to medium and continue to stir. The mixture will start to get sticky and lumpy. Continue to stir, removing the thicker parts of the mixture from the bottom and rotate to the the top. Once the mixture thickens it will start to release from the bottom of the pan when you lift it out with a spoon. When it's evenly thickened, remove the dough from the pan and place it on a heat safe surface to cool. Once it is cool to the touch, try your hand at kneading it! This recipe is great for tactile learners like I have and it makes the house smell great.
0 Comments
 One of the things I miss most about living in Illlinois, was the snow. No... not the shoveling and the freezing your nose off kind of snow. I just loved watching it fall softly in front of the streetlights from the comfort of my livingroom window. How it sparkled and built upon tree limbs... Anyway, we just had to make our own this year. Here is what you need to make snow:
First, you will need to draw some basic snowflakes or print them onto paper. You could also do this by drawing them freehand using a fourlined configuration like we did, OR you could carefully use your computer monitor as a lightbox and trace your own. A word of caution on this one though..Some computer monitors may be sensitive to pressure, so be very gentle. Using a washable marker may be used for this method. Once you have some snow drawn on paper, place the paper under the sheet of glass. Fill and warm up your glue gun. When hot, trace over your drawing using thick lines of glue. The thicker the better! The snow flakes will harden and they will be easier to remove from the glass if thick. 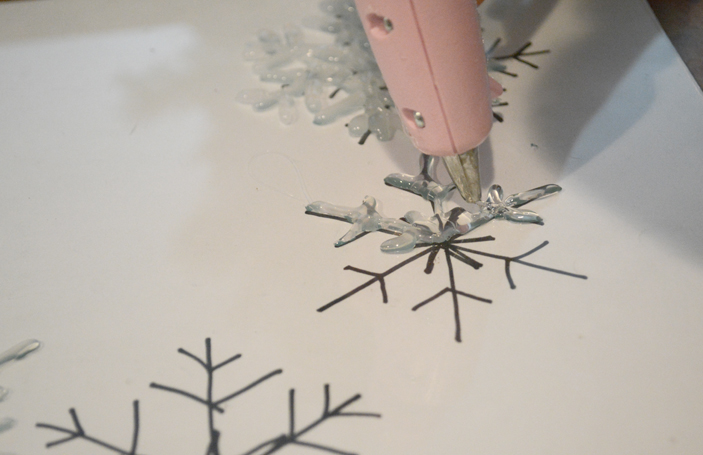 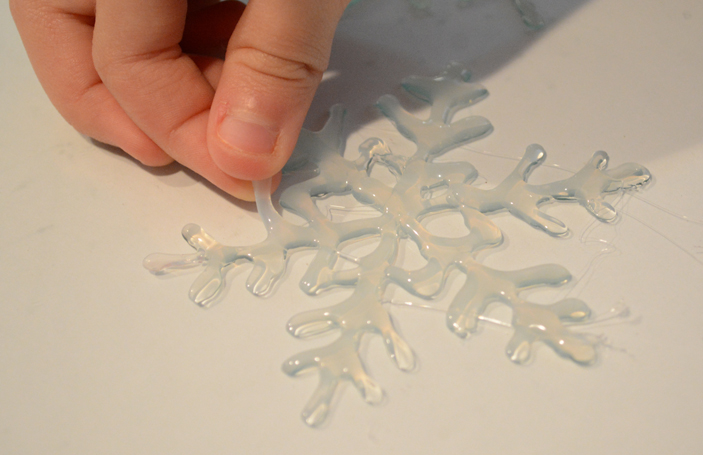 At first, you might find it difficult to make it perfect and they may not look like much...But remember, all snow flakes are different and no two are alike!
Besides, when you put them on your tree, the light shines through them and you will not notice the imperfections. This is a great opportunity for you to share with your children how complex and different snowflakes are. And most importantly, like a snowflake, each one of us is a masterpiece of God’s creation. |

About me...Like many other moms I wear many hats. I am a sinner after God's heart, a wife to a wannabe Jedi Knight, and a blessed mom to two very different girls. Categories
All
What we are reading now...
 SubscribeJust a note...I often link to resources that I personally use and recommend.
I participate in the Amazon Services LLC Associates Program and if you enter Amazon.com through my blog and then make a purchase, I will receive a small percentage of the sale. I will never recommend a product or resource just to be compensated financially. If I write that we use or love something, you can trust that we do. DisclosureAll content and photo images of this blog are protected under all applicable international, federal, state, and local Copyright laws. All rights reserved to Two Arrows Homeschool. You have my written permission to repost portions of this blog elsewhere as long as Two Arrows is cited within your post and a link is created to redirect your readers back to Two Arrows Homeschool.

|
